These notes were adapted from https://microsoft.github.io/code-with-engineering-playbook/source-control/git-guidance/
Git is a distributed version control system. Every participant has a local copy of the source-code, and the attached history that is kept in sync by comparing commit hashes (SHA hashes of changes between each git commit command) making up the latest version (called HEAD).
repo 1: A -> B -> C -> D -> HEADrepo 2: A -> B -> HEADrepo 3: X -> Y -> Z -> HEADrepo 4: A -> J -> HEADrepo 1: A -> B -> C -> D -> HEADrepo 2: A -> B -> HEADrepo 3: X -> Y -> Z -> HEADrepo 4: A -> J -> HEADSince they share a common history, repo 1 and repo 2 can be synchronized fairly easily, repo 4 may be able to synchronize as well, but it’s going to have to add a commit (J, and maybe a merge commit) to repo 1. Repo 3 cannot be easily synchronized with the others. Everything related to these commits is stored in a local .git directory in the root of the repository.
In other words, by using Git you are simply creating immutable file histories that uniquely identify the current state and therefore allow sharing whatever comes after.
A basic Git workflow is as follows.
# pull the latest changesgit pull
# start a new feature branch based on the "develop" branchgit checkout -b feature/123-add-git-instructions develop
# another way to do the same thing:git switch -c feature/123-add-git-instructions develop
# edit some files
# add and commit the filesgit add <file>git commit -m "add basic instructions"
# edit some files
# add and commit the filesgit add <file>git commit
# "git commit" will cause your $EDITOR will appear -- this is an environment variable that can be changed. Common CLI options are `nano`, `vim`, and `emacs`. In a git GUI, a built-in editor will appear at this point.# This allows you to write multi-line commit messages, which is important for large changes.
# check your changes# 'git status' may be the git command I use mostgit status
# by default, `git diff` shows the line-by-line additions/removals/changes to all unstaged changes in your repositorygit diff
# push the branch to the remote repository (i.e. -- add the branch to the remote repo)git push --set-upstream origin feature/123-add-git-instructions# pull the latest changesgit pull
# start a new feature branch based on the "develop" branchgit checkout -b feature/123-add-git-instructions develop
# another way to do the same thing:git switch -c feature/123-add-git-instructions develop
# edit some files
# add and commit the filesgit add <file>git commit -m "add basic instructions"
# edit some files
# add and commit the filesgit add <file>git commit
# "git commit" will cause your $EDITOR will appear -- this is an environment variable that can be changed. Common CLI options are `nano`, `vim`, and `emacs`. In a git GUI, a built-in editor will appear at this point.# This allows you to write multi-line commit messages, which is important for large changes.
# check your changes# 'git status' may be the git command I use mostgit status
# by default, `git diff` shows the line-by-line additions/removals/changes to all unstaged changes in your repositorygit diff
# push the branch to the remote repository (i.e. -- add the branch to the remote repo)git push --set-upstream origin feature/123-add-git-instructionsWhile what is shown above are CLI commands, you can replicate any CLI command using a Git GUI of your choice — all Git GUIs will have these commands available to them. Android Studio has built-in git Version Control, and GitHub Desktop is a recommended GUI for working with GitHub as well.
An additional Android Studio Git recommendation: this link starting from step 4 is very useful
An additional GitHub Desktop recommendation: this link is very useful
Whenever you want to make a change to a repository, you need to first clone it. Cloning a repository pulls down a full copy of all the repository data, so that you can work on it locally. This copy includes all versions of every file and folder for the project.
git clone https://github.com/username/repo-namegit clone https://github.com/username/repo-nameYou only need to clone the repository the first time. Before any
subsequent branches you can sync any changes from the remote repository
using git pull.
To avoid adding code that has not been peer reviewed to the main branch
(ex. develop) we typically work in feature branches, and merge these
back to the main trunk with a Pull Request. It’s even the case that
often the main or develop branch of a repository are locked so that
you can’t make changes without a Pull Request. Therefore, it is useful
to create a separate branch for your local/feature work, so that you can
work and track your changes in this branch.
Pull the latest changes and create a new branch for your work based on
the trunk (in this case develop).
git pull
# checkout is used for commits, -b is a branch flaggit checkout -b feature/feature-name develop
# an alternative that does the same thing, "-c" to create the branch:git switch -c feature/feature-name develop
# deleting a branch you don't need/created by mistakegit branch -d developgit pull
# checkout is used for commits, -b is a branch flaggit checkout -b feature/feature-name develop
# an alternative that does the same thing, "-c" to create the branch:git switch -c feature/feature-name develop
# deleting a branch you don't need/created by mistakegit branch -d developAt any point, you can move between the branches with
git checkout <branch> or git switch <branch> as long as you have committed or stashed your
work. If you forget the name of your branch use git branch -a to list all branches (see Using remote branches).
To avoid losing work, it is good to commit often in small chunks. This allows you to revert only the last changes if you discover a problem and also neatly explains exactly what changes were made and why.
-
Make changes to your branch
-
Check what files were changed
Terminal window > git statusOn branch feature/271-basic-commit-infoChanges not staged for commit:(use "git add <file>..." to update what will be committed)(use "git restore <file>..." to discard changes in working directory)modified: source-control/git-guidance/README.mdTerminal window > git statusOn branch feature/271-basic-commit-infoChanges not staged for commit:(use "git add <file>..." to update what will be committed)(use "git restore <file>..." to discard changes in working directory)modified: source-control/git-guidance/README.md -
Track the files you wish to include in the commit. To track all modified files:
Terminal window git add --allTerminal window git add --allOr to track only specific files:
Terminal window git add source-control/git-guidance/README.mdTerminal window git add source-control/git-guidance/README.md -
Commit the changes to your local branch with a descriptive commit message. See the Commit Best Practises section for more detais and recommendations.
Terminal window git commit -m "add oneline comment for simple change/temporary commit"git commit -m "Subject line of commit" -m "Each subsequent -m argument is separated by a new line"git commit # Without the "-m" arugment, your $EDITOR is opened to write a multi-line commit messageTerminal window git commit -m "add oneline comment for simple change/temporary commit"git commit -m "Subject line of commit" -m "Each subsequent -m argument is separated by a new line"git commit # Without the "-m" arugment, your $EDITOR is opened to write a multi-line commit message
When you are done working, push your changes to a branch in the remote repository using:
git pushgit pushThe first time you push, you first need to set an upstream branch as
follows. After the first push, the --set-upstream parameter and branch
name are not needed anymore.
git push --set-upstream origin feature/feature-namegit push --set-upstream origin feature/feature-nameOnce the feature branch is pushed to the remote repository, it is visible to anyone with access to the repository.
A local git repository can have one or more backing remote repositories — it’s good to know what you are pushing your code to. You can list the remote repositories using git remote - by default, the remote repository you cloned from will be called origin:
> git remote -vorigin https://github.com/microsoft/code-with-engineering-playbook.git (fetch)origin https://github.com/microsoft/code-with-engineering-playbook.git (push)> git remote -vorigin https://github.com/microsoft/code-with-engineering-playbook.git (fetch)origin https://github.com/microsoft/code-with-engineering-playbook.git (push)These notes adapted from https://www.atlassian.com/git/tutorials/syncing/git-fetch and https://www.atlassian.com/git/tutorials/syncing/git-pull
When downloading content from a remote repo, git pull and git fetch commands are available to accomplish the task. You can consider git fetch the ‘safe’ version of the two commands. It will download the remote content but not update your local repo’s working state, leaving your current work intact. git pull is the more aggressive alternative; it will download the remote content for the active local branch and immediately execute git merge to create a merge commit for the new remote content. If you have pending changes in progress this will cause conflicts and kick-off the merge conflict resolution flow.
The following example walks through the typical workflow for synchronizing your local repository with the central repository’s main branch.
git fetch origingit fetch originThis will display the branches that were downloaded:
a1e8fb5..45e66a4 main -> origin/maina1e8fb5..9e8ab1c develop -> origin/develop* [new branch] some-feature -> origin/some-featurea1e8fb5..45e66a4 main -> origin/maina1e8fb5..9e8ab1c develop -> origin/develop* [new branch] some-feature -> origin/some-featureThe commits from these new remote branches are shown as squares instead of circles in the diagram below. As you can see, git fetch gives you access to the entire branch structure of another repository.
git pull, on the other hand, is actually a combination of git fetch and git merge by default.
To better demonstrate the pull and merging process let us consider the following example. Assume we have a repository with a main branch and a remote origin.
In this scenario, git pull will download all the changes from the point where the local and main diverged.
git pull will fetch the diverged remote commits which are A-B-C. The default pull process will then create a new local merge commit containing the content of the new diverged remote commits.
A --rebase option can also be passed to git pull to use a rebase merging strategy instead of a merge commit.
See the first image in the tabs below: local and main diverge at commit E. The second and third tabs show what happens after pull and pull --rebase respectively.
Click on the git pull and git pull --rebase tabs above to see how the history is updated by these two commands.

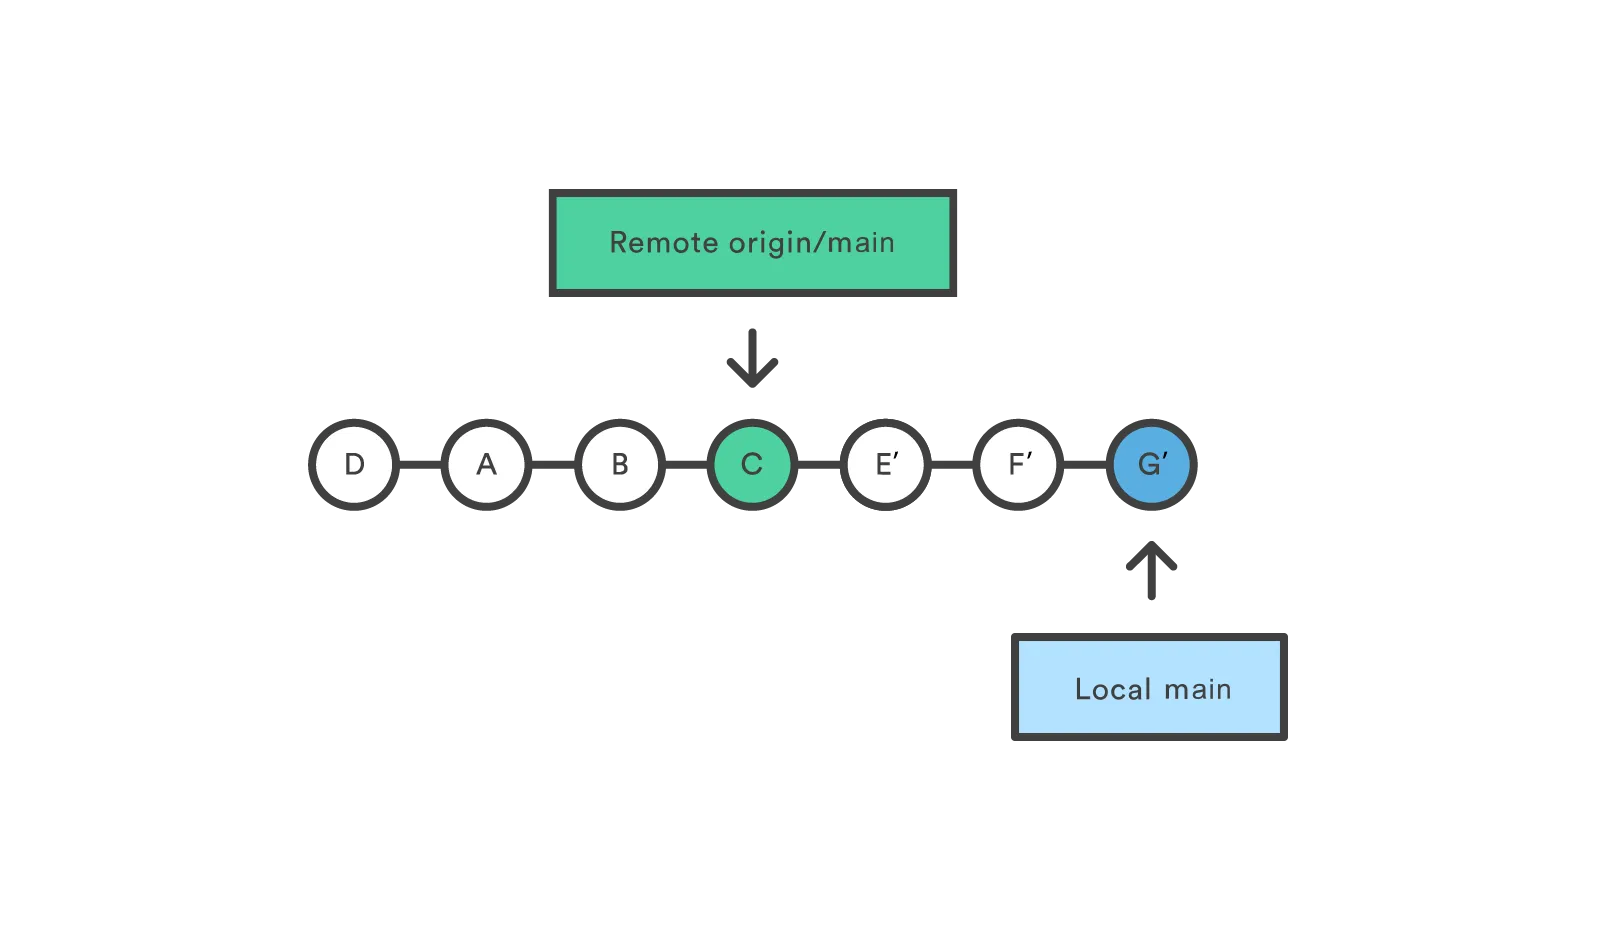
In this diagram, we can see the new merge commit H that results from git pull.
This commit is a new merge commit that contains the contents of remote A-B-C commits and has a combined log message.

In this diagram, we can now see that a rebase pull does not create the new H commit. Instead, the rebase has copied the remote commits A—B—C and rewritten the local commits E—F—G to appear after them them in the local origin/main commit history.
More discussion of the differences between merging and rebasing can be found in the next lecture.
Some handy commands:
## Keeping your developer branch (e.g. nav-codelab) in sync with main## Useful for e.g. you added the PR template to main after starting development workgit switch nav-codelabgit pull --rebase## Keeping your developer branch (e.g. nav-codelab) in sync with main## Useful for e.g. you added the PR template to main after starting development workgit switch nav-codelabgit pull --rebaseWhen you clone a repository with many branches (like my example assignment 3 repository) it can appear like the only branch available is the default branch (here main):
$ git clone https://github.com/michaelhaaf/5A6-F23-assignment3/$ cd 5A6-F23-assignment3$ git statusOn branch mainYour branch is up to date with 'origin/main'.
# use git branch to view repository branches$ git branch* main
$ git clone https://github.com/michaelhaaf/5A6-F23-assignment3/$ cd 5A6-F23-assignment3$ git statusOn branch mainYour branch is up to date with 'origin/main'.
# use git branch to view repository branches$ git branch* mainUsing git branch alone only lists the currently existing local branches. We can see view remote branches using the following parameters:
git branch -rlist remote branchesgit branch -alist all branches (local and remote)
$ git branch -a* main  # the astertix indicates local branch we have checked out  origin/HEAD -> origin/main  origin/main  origin/nav-codelab  origin/state-codelab
$ git branch -r  origin/HEAD -> origin/main  origin/main  origin/nav-codelab  origin/state-codelab
$ git branch -a* main # the astertix indicates local branch we have checked out origin/HEAD -> origin/main origin/main origin/nav-codelab origin/state-codelab
$ git branch -r origin/HEAD -> origin/main origin/main origin/nav-codelab origin/state-codelabYou can create and “switch” to a local copy of any existing remote with git switch:
$ git switch state-codelabbranch 'state-codelab' set up to track 'origin/state-codelab'.Switched to a new branch 'state-codelab'
$ git branch -a  main* state-codelab  origin/HEAD -> origin/main  origin/main  origin/nav-codelab  origin/state-codelab
$ git switch state-codelabbranch 'state-codelab' set up to track 'origin/state-codelab'.Switched to a new branch 'state-codelab'
$ git branch -a main* state-codelab origin/HEAD -> origin/main origin/main origin/nav-codelab origin/state-codelabYou can set multiple remotes. This is useful for example if you want to work with a forked version of the repository. For more info on how to set upstream remotes and syncing repositories when working with forks see GitHub’s Working with forks documentation.
If the repository is changed in some way, for example a name change, or if you want to switch between HTTPS and SSH you need to update the remote
    # list the existing remotes    > git remote -v    origin  https://hostname/username/repository-name.git (fetch)    origin  https://hostname/username/repository-name.git (push)
    # change the remote url    git remote set-url origin https://hostname/username/new-repository-name.git
# verify that the remote URL has changed > git remote -v origin https://hostname/username/new-repository-name.git (fetch) origin https://hostname/username/new-repository-name.git (push) # list the existing remotes > git remote -v origin https://hostname/username/repository-name.git (fetch) origin https://hostname/username/repository-name.git (push)
# change the remote url git remote set-url origin https://hostname/username/new-repository-name.git
# verify that the remote URL has changed > git remote -v origin https://hostname/username/new-repository-name.git (fetch) origin https://hostname/username/new-repository-name.git (push)These notes are adapted from a neat blogpost from GitHub with actual examples that you can follow along with.
A commit combines changes into a logical unit. Adding a descriptive commit message can aid in comprehending the code changes and understanding the rationale behind the modifications.
Commits should minimize the effort needed to build a mental model of the changes they introduce. With effort tied to having a “just right” amount of information, the key to a good commit is fitting into quantified upper and lower bounds on that information.
A small commit is one with minimal scope; it does one “thing.” This often correlates to minimizing the modified lines of cone, but that isn’t a firm requirement. For example, changing the name of a commonly-used function may modify hundreds of lines of code, but its constrained scope makes it simple to both explain and review.
A commit is atomic when it is a stable, independent unit of change. In concrete terms, a repository should still build, pass tests, and generally function if rolled back to that exact commit without needing other changes. In an atomic commit, your reader will have everything they need to evaluate the change in the commit itself.
Commits can be split and combined to adjust their size and scope — tools for doing so are covered in later sections of this document.
The essential parts of a commit message are:
- subject line: a short description of the commit, maximum 50 characters long
- body: Describe what you’re doing and why you’re doing it in the commit message.
Learn by example from famous open source developer Tim Pope:
Capitalized, short (50 chars or less) summary
More detailed explanatory text, if necessary.  Wrap it to about 72characters or so.  In some contexts, the first line is treated as thesubject of an email and the rest of the text as the body.  The blankline separating the summary from the body is critical (unless you omitthe body entirely); tools like rebase can get confused if you run thetwo together.
Write your commit message in the imperative: "Fix bug" and not "Fixed bug"or "Fixes bug."  This convention matches up with commit messages generatedby commands like git merge and git revert.
Further paragraphs come after blank lines.
- Bullet points are okay, too
- Typically a hyphen or asterisk is used for the bullet, followed by a  single space, with blank lines in between, but conventions vary here
- Use a hanging indent
Capitalized, short (50 chars or less) summary
More detailed explanatory text, if necessary. Wrap it to about 72characters or so. In some contexts, the first line is treated as thesubject of an email and the rest of the text as the body. The blankline separating the summary from the body is critical (unless you omitthe body entirely); tools like rebase can get confused if you run thetwo together.
Write your commit message in the imperative: "Fix bug" and not "Fixed bug"or "Fixes bug." This convention matches up with commit messages generatedby commands like git merge and git revert.
Further paragraphs come after blank lines.
- Bullet points are okay, too
- Typically a hyphen or asterisk is used for the bullet, followed by a single space, with blank lines in between, but conventions vary here
- Use a hanging indentI personally like to do the following:
lowercase, (because it's nicer to look at) short summary
Explanation (similar to Tim's note above, treat it like an email with a quick context paragraph)
Requirements resolved:- One bullet point per discrete requirement (i.e. defined in an Issue, you could link it here)
Changes made:- Each discrete code change is a separate bullet- You should be able to look at this commit message next to the commit diff and see each change represented in a bullet
lowercase, (because it's nicer to look at) short summary
Explanation (similar to Tim's note above, treat it like an email with a quick context paragraph)
Requirements resolved:- One bullet point per discrete requirement (i.e. defined in an Issue, you could link it here)
Changes made:- Each discrete code change is a separate bullet- You should be able to look at this commit message next to the commit diff and see each change represented in a bulletYou can see examples in action through in my partially-solved Assignment 3 Pull Request, in case you are having trouble visualising this.
More resources if you are interested:
- A Note About Git Commit Messages
- Conventional Commits
- Git commit best practices
- How to Write a Git Commit Message
- How to Write Better Git Commit Messages
- Information in commit messages
- On commit messages
This section was adapted from Atlassian: Advanced git log
The main reason for caring about commit best practises is to make developing easier — it seems like extra work at first, but after a while you start to see that 90% of coding is reading the code of others and it pays dividends to build habits that produce legible code.
We can immediately reap the benefits of concise and descriptive commits when viewing them with the git log tool. Even if the commit quality isn’t that high, however, it’s often very useful to be able to see the past series of changes to a codebase without having to click around on a website.
There are many ways to improve the user experience of git log by taking advantage of some of its most useful parameters (this is common in git). We can even compose those parameters together to produce combinations of useful effects (which is a theme of this course). A few examples follow.
The --oneline flag condenses each commit to a single line. By default, it displays only the commit ID and the first line of the commit message. Your typical git log --oneline output will look something like this:
0e25143 Merge branch 'feature'ad8621a Fix a bug in the feature16b36c6 Add a new feature23ad9ad Add the initial code base0e25143 Merge branch 'feature'ad8621a Fix a bug in the feature16b36c6 Add a new feature23ad9ad Add the initial code baseThis is very useful for getting a high-level overview of your project.
Many times it’s useful to know which branch or tag each commit is associated with. The --decorate flag makes git log display all of the references (e.g., branches, tags, etc) that point to each commit.
This can be combined with other configuration options. For example, running git log --oneline --decorate will format the commit history like so:
0e25143 (HEAD, main) Merge branch 'feature'ad8621a (feature) Fix a bug in the feature16b36c6 Add a new feature23ad9ad (tag: v0.9) Add the initial code base0e25143 (HEAD, main) Merge branch 'feature'ad8621a (feature) Fix a bug in the feature16b36c6 Add a new feature23ad9ad (tag: v0.9) Add the initial code baseThis lets you know that the top commit is also checked out (denoted by HEAD) and that it is also the tip of the main branch. The second commit has another branch pointing to it called feature, and finally the 4th commit is tagged as v0.9.
Branches, tags, HEAD, and the commit history are almost all of the information contained in your Git repository, so this gives you a more complete view of the logical structure of your repository.
The git log command includes many options for displaying diffs with each commit. Two of the most common options are --stat and --patch.
The --stat option displays the number of insertions and deletions to each file altered by each commit (note that modifying a line is represented as 1 insertion and 1 deletion). This is useful when you want a brief summary of the changes introduced by each commit. For example, the following commit added 67 lines to the hello.py file and removed 38 lines:
commit f2a238924e89ca1d4947662928218a06d39068c3Author: John <john@example.com>Date:   Fri Jun 25 17:30:28 2014 -0500
Add a new feature
 hello.py | 105 ++++++++++++++++++++++++----------------- 1 file changed, 67 insertion(+), 38 deletions(-)
commit f2a238924e89ca1d4947662928218a06d39068c3Author: John <john@example.com>Date: Fri Jun 25 17:30:28 2014 -0500
Add a new feature
hello.py | 105 ++++++++++++++++++++++++----------------- 1 file changed, 67 insertion(+), 38 deletions(-)The amount of + and - signs next to the file name show the relative number of changes to each file altered by the commit. This gives you an idea of where the changes for each commit can be found.
If you want to see the actual changes introduced by each commit, you can pass the -p option to git log. This outputs the entire patch representing that commit:
commit 16b36c697eb2d24302f89aa22d9170dfe609855bAuthor: Mary <mary@example.com>Date:   Fri Jun 25 17:31:57 2014 -0500
Fix a bug in the feature
diff --git a/hello.py b/hello.pyindex 18ca709..c673b40 100644--- a/hello.py+++ b/hello.py@@ -13,14 +13,14 @@ B-print("Hello, World!")+print("Hello, Git!")
commit 16b36c697eb2d24302f89aa22d9170dfe609855bAuthor: Mary <mary@example.com>Date: Fri Jun 25 17:31:57 2014 -0500
Fix a bug in the feature
diff --git a/hello.py b/hello.pyindex 18ca709..c673b40 100644--- a/hello.py+++ b/hello.py@@ -13,14 +13,14 @@ B-print("Hello, World!")+print("Hello, Git!")For commits with a lot of changes, the resulting output can become quite long and unwieldy. More often than not, if you’re displaying a full patch, you’re probably searching for a specific change. For this, you want to use the pickaxe option (see (#search-by-content)).
It’s also possible to search for commits that introduce or remove a particular line of source code. This is called a pickaxe, and it takes the form of -S"". For example, if you want to know when the string Hello, World! was added to any file in the project, you would use the following command:
git log -S"Hello, World!"git log -S"Hello, World!"If you want to search using a regular expression instead of a string, you can use the -G"" flag instead.
This is a very powerful debugging tool, as it lets you locate all of the commits that affect a particular line of code. It can even show you when a line was copied or moved to another file.
The --graph option draws an ASCII graph representing the branch structure of the commit history. This is commonly used in conjunction with the --oneline and --decorate commands to make it easier to see which commit belongs to which branch:
git log --graph --oneline --decorategit log --graph --oneline --decorateFor a simple repository with just 2 branches, this will produce the following:
* 0e25143 (HEAD, main) Merge branch 'feature'|\| * 16b36c6 Fix a bug in the new feature| * 23ad9ad Start a new feature* | ad8621a Fix a critical security issue|/* 400e4b7 Fix typos in the documentation* 160e224 Add the initial code base* 0e25143 (HEAD, main) Merge branch 'feature'|\| * 16b36c6 Fix a bug in the new feature| * 23ad9ad Start a new feature* | ad8621a Fix a critical security issue|/* 400e4b7 Fix typos in the documentation* 160e224 Add the initial code baseThe asterisk shows which branch the commit was on, so the above graph tells us that the 23ad9ad and 16b36c6 commits are on a topic branch and the rest are on the main branch.