When sharing code with others, it is often required to organize the developer history mores carefully than when working alone. Each git commit is a snapshot of the codebase, and it is important that each snapshot is sensible and recoverable.
At the same time, it can sometimes feel like adding too many rules to the way you code can be prohibitive to the creative development process. Is there a way to get the best of both worlds?
The figure below from Oliver Steele is a clear depiction of the kind of workflow common in shared development with repositories like GitHub:
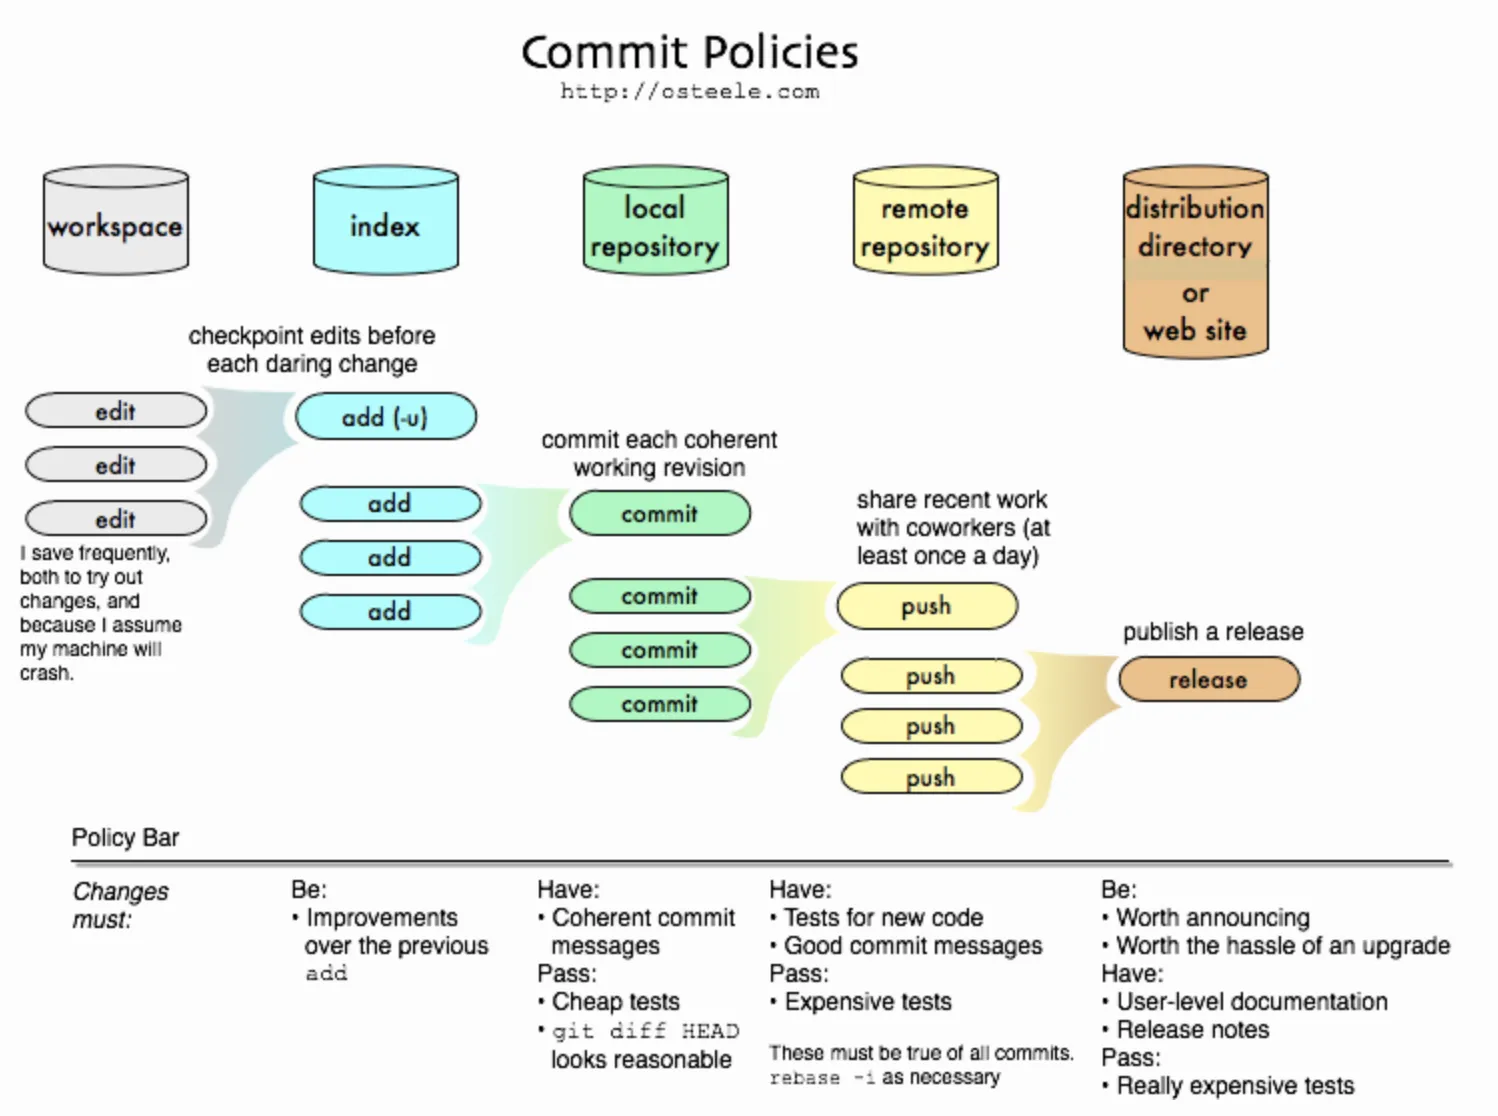
Terminology review:
- workspace: the source code on your file system
- index: the staged files in your local repository
- local repository: committed changes in your local repository
- remote repository: pushed changes in your shared GitHub repository
- distribution: published releases of your application
To paraphrase from the blog: by placing less restrictive “policies” to the left of the graph, you can update your own work frequently without worrying about affecting the work of others. By placing more restrictive “policies” on the right, you can maintain the stability of releases. And by incrementing the restrictiveness of these policies in small steps, you can reduce the backlog of code that is “trapped” towards the left.
Setting a “policy bar” like requiring that commit messages are “good” before pushing to a shared repository requires that you can have a second chance at making commits, that is, to be able to refactor not just your code, but your commit history, before pushing.
It turns out that before commits are pushed to a shared repository, they can be modified directly in git — you can see in the small print of the figure above a reference to the command git rebase -i, which is one of the more common commands for doing this kind of work.
Whenever you have a code review that requests you fix things like commit messages/titles, or requests that you split an existing commit into smaller chunks, you will need to reset or rebase those commits, recover the changes, and create new commits. This is not so difficult, once you are used to it. These notes should help give you concrete examples of the variety of git commands available to you for managing complex changes.
The following notes are adapted from https://www.atlassian.com/git/tutorials/comparing-workflows and https://www.atlassian.com/git/tutorials/comparing-workflows/feature-branch-workflow
Before getting into detailed examples, it’s worth going over the big picture of the problem we are trying to solve.
There are many possible ways to organize how code should be shared among developers. This is one of the core problems of the DevOps field.
There are three main workflows worth knowing about for our purposes:
- the Centralized workflow, where developer share a
mainbranch and all changes are committed to this branch. Developers manage conflicts locally and either merge or rebase to update themainbranch. This is the defaultgitworkflow and requires no branches. - the Git feature branch workflow is common, and is the main workflow we will be learning about this semester.
- The Forking workflow is very common in open source software projects where there are many developers who do not necessarily know eachother or work together, allowing their work to be more independent while stille facilitating collaboration. We will not cover this in detail in our class, but it is worth knowing about as you will see it in your travels.
In our project milestone, direct pushes to main are prohibited — this means that we will need to request a pull from main branch instead, merging the feature you develop with the main codebase once it is approved. This makes sure that all code in the final product is (https://microsoft.github.io/code-with-engineering-playbook/code-reviews/).
See Pull Requests in GitHub for clarifications about how to create a pull request.
If multiple people make changes to the same files, you may need to resolve any conflicts that have occurred before you can merge.
# check out the develop branch and get the latest changesgit checkout developgit pull
# check out your branchgit checkout <your branch>
# merge the develop branch into your branchgit merge develop
# if merge conflicts occur, above command will fail with a message telling you that there are conflicts to be solved
# find which files need to be resolved, and edit them to resolve the conflictgit status# check out the develop branch and get the latest changesgit checkout developgit pull
# check out your branchgit checkout <your branch>
# merge the develop branch into your branchgit merge develop
# if merge conflicts occur, above command will fail with a message telling you that there are conflicts to be solved
# find which files need to be resolved, and edit them to resolve the conflictgit statusGit conflicts produce a “diff”, which can be resolved by selecting which parts of the conflict you want to accept or reject:
- Accept your changes (current)
- Accept the changes from dev branch (incoming)
- Accept them both and fix the code (probably needed)
Here are lines that are either unchanged from the commonancestor, or cleanly resolved because only one side changed.<<<<<<< ours:sample.txt # git resolution markerConflict resolution is hard; # changed in ours:sample.txtlet's go shopping. # changes in ours:sample.txt======= # git resolution dividerGit makes conflict resolution easy. # changed in theirs:sample.txt>>>>>>> theirs:sample.txt # git resolution dividerAnd here is another line that is cleanly resolved or unmodifiedHere are lines that are either unchanged from the commonancestor, or cleanly resolved because only one side changed.<<<<<<< ours:sample.txt # git resolution markerConflict resolution is hard; # changed in ours:sample.txtlet's go shopping. # changes in ours:sample.txt======= # git resolution dividerGit makes conflict resolution easy. # changed in theirs:sample.txt>>>>>>> theirs:sample.txt # git resolution dividerAnd here is another line that is cleanly resolved or unmodifiedYou can use git checkout --ours/theirs to resolve these conflicts automatically:
After running git checkout --ours, sample.txt is automatically updated to only include the local changes:
Here are lines that are either unchanged from the commonancestor, or cleanly resolved because only one side changed.Git makes conflict resolution easy.And here is another line that is cleanly resolved or unmodifiedHere are lines that are either unchanged from the commonancestor, or cleanly resolved because only one side changed.Git makes conflict resolution easy.And here is another line that is cleanly resolved or unmodifiedAfter running git checkout --theirs, sample.txt is automatically updated to only include the remote changes:
Here are lines that are either unchanged from the commonancestor, or cleanly resolved because only one side changed.Conflict resolution is hard;let's go shopping.And here is another line that is cleanly resolved or unmodifiedHere are lines that are either unchanged from the commonancestor, or cleanly resolved because only one side changed.Conflict resolution is hard;let's go shopping.And here is another line that is cleanly resolved or unmodifiedYou can always manually resolve conflicts using your favourite editor. This way you can combine the two versions and modify them as you see fit:
Here are lines that are either unchanged from the commonancestor, or cleanly resolved because only one side changed.Git makes conflict resolution easy.Nevertheless, let's go shopping anyway.And here is another line that is cleanly resolved or unmodifiedHere are lines that are either unchanged from the commonancestor, or cleanly resolved because only one side changed.Git makes conflict resolution easy.Nevertheless, let's go shopping anyway.And here is another line that is cleanly resolved or unmodifiedThe merge process is completed when all git conflict markers <<<< and ==== and >>>> are removed from the file. Make sure you test the result by building your project before continuing.
# conclude the mergegit merge --continue
# verify that everything went okgit log
# push the changes to the remote branchgit push# conclude the mergegit merge --continue
# verify that everything went okgit log
# push the changes to the remote branchgit pushIf no other conflicts appear, the PR can now be merged, and your branch
deleted. Use squash to reduce your changes into a single commit, so
the commit history can be within an acceptable size.
The following notes were adapted from the MAN page of git-rebase.
In my mind, git rebase is the more useful cousin of git merge.
git-rebase: Reapply commits from one branch on top of another branch. A short example follows.
Assume you have a branch topic that you have been working on. In the time since you began work, other developers have completed pull requests to main branch, and so your topic branch has fallen behind.
You can apply the following command (either one, same result):
git rebase maingit rebase main topicgit rebase maingit rebase main topicAnd see the following change to your branches (click the tabs):
a---b---c topic /d---e---f---g main a---b---c topic /d---e---f---g main a*---b*---c* topic /d---e---f---g main a*---b*---c* topic /d---e---f---g mainA range of commits can also be removed with rebase. If we have the following situation:
E---F---G---H---I---J topicAE---F---G---H---I---J topicAthen the command git rebase --onto topicA~5 topicA~3 topicA would result in the removal of commits F and G:
E---H*---I*---J* topicAE---H*---I*---J* topicAThis is useful if F and G were flawed in some way, or should not be
part of topicA. Note that the argument to --onto and the <upstream>
parameter can be any valid commit.
In case of conflict, git rebase will stop at the first problematic commit and leave conflict markers in the tree. You can use git diff to locate the markers <<<<<< and make edits to resolve the conflict.
For each file you edit, you need to tell git that the conflict has been resolved, typically this would be done with git add <filename>
After resolving the conflict manually and updating the index with the desired resolution, you can continue the rebasing process with git rebase --continue
Alternatively, you can undo the git rebase with git rebase --abort
git stash is super handy if you have un-committed changes in your
working directory, but you want to work on a different branch. You can
run git stash, save the un-committed work, and revert to the HEAD
commit. You can retrieve the saved changes by running git stash pop:
git stash…git stash popgit stash…git stash popOr you can move the current state into a new branch:
git stash branch <new_branch_to_save_changes>git stash branch <new_branch_to_save_changes>$ git add -p AdvancedStateAndSideEffectsCodelab/diff --git a/AdvancedStateAndSideEffectsCodelab/app/build.gradle b/AdvancedStateAndSideEffectsCodelab/app/build.gradleindex 726de7a..47e44f7 100644--- a/AdvancedStateAndSideEffectsCodelab/app/build.gradle+++ b/AdvancedStateAndSideEffectsCodelab/app/build.gradle@@ -42,16 +42,6 @@ android { manifestPlaceholders = [MAPS_API_KEY: properties.getProperty("MAPS_API_KEY", "")] }
- signingConfigs {- // We use a bundled debug keystore, to allow debug builds from CI to be upgradable- debug {- storeFile rootProject.file('debug.keystore')- storePassword 'android'- keyAlias 'androiddebugkey'- keyPassword 'android'- }- }- buildTypes { debug { signingConfig signingConfigs.debug(1/2) Stage this hunk [y,n,q,a,d,j,J,g,/,e,?]? n$ git add -p AdvancedStateAndSideEffectsCodelab/diff --git a/AdvancedStateAndSideEffectsCodelab/app/build.gradle b/AdvancedStateAndSideEffectsCodelab/app/build.gradleindex 726de7a..47e44f7 100644--- a/AdvancedStateAndSideEffectsCodelab/app/build.gradle+++ b/AdvancedStateAndSideEffectsCodelab/app/build.gradle@@ -42,16 +42,6 @@ android { manifestPlaceholders = [MAPS_API_KEY: properties.getProperty("MAPS_API_KEY", "")] }
- signingConfigs {- // We use a bundled debug keystore, to allow debug builds from CI to be upgradable- debug {- storeFile rootProject.file('debug.keystore')- storePassword 'android'- keyAlias 'androiddebugkey'- keyPassword 'android'- }- }- buildTypes { debug { signingConfig signingConfigs.debug(1/2) Stage this hunk [y,n,q,a,d,j,J,g,/,e,?]? n@@ -126,6 +116,7 @@ dependencies { def lifecycle_version = "2.6.2" implementation "androidx.lifecycle:lifecycle-viewmodel-compose:$lifecycle_version" implementation "androidx.lifecycle:lifecycle-viewmodel-ktx:$lifecycle_version"+ implementation "androidx.lifecycle:lifecycle-runtime-compose:$lifecycle_version" implementation "com.google.dagger:hilt-android:2.48.1" kapt "com.google.dagger:hilt-compiler:2.48.1"
(2/2) Stage this hunk [y,n,q,a,d,K,g,/,e,?]? y@@ -126,6 +116,7 @@ dependencies { def lifecycle_version = "2.6.2" implementation "androidx.lifecycle:lifecycle-viewmodel-compose:$lifecycle_version" implementation "androidx.lifecycle:lifecycle-viewmodel-ktx:$lifecycle_version"+ implementation "androidx.lifecycle:lifecycle-runtime-compose:$lifecycle_version" implementation "com.google.dagger:hilt-android:2.48.1" kapt "com.google.dagger:hilt-compiler:2.48.1"
(2/2) Stage this hunk [y,n,q,a,d,K,g,/,e,?]? ydiff --git a/AdvancedStateAndSideEffectsCodelab/app/src/main/java/androidx/compose/samples/crane/home/CraneHome.kt b/AdvancedStateAndSideEffectsCodelab/app/src/main/java/androidx/compose/samples/crane/home/CraneHome.ktindex 5074428..4edde48 100644--- a/AdvancedStateAndSideEffectsCodelab/app/src/main/java/androidx/compose/samples/crane/home/CraneHome.kt+++ b/AdvancedStateAndSideEffectsCodelab/app/src/main/java/androidx/compose/samples/crane/home/CraneHome.kt@@ -36,6 +36,7 @@ import androidx.compose.samples.crane.base.ExploreSection import androidx.compose.samples.crane.data.ExploreModel import androidx.compose.ui.Modifier import androidx.compose.ui.graphics.Color+import androidx.lifecycle.compose.collectAsStateWithLifecycle import androidx.lifecycle.viewmodel.compose.viewModel
typealias OnExploreItemClicked = (ExploreModel) -> Unit(1/2) Stage this hunk [y,n,q,a,d,j,J,g,/,e,?]? y@@ -76,8 +77,8 @@ fun CraneHomeContent( modifier: Modifier = Modifier, viewModel: MainViewModel = viewModel(), ) {- // TODO Codelab: collectAsStateWithLifecycle step - consume stream of data from the ViewModel- val suggestedDestinations: List<ExploreModel> = remember { emptyList() }+ val suggestedDestinations by viewModel.suggestedDestinations.collectAsStateWithLifecycle()+
val onPeopleChanged: (Int) -> Unit = { viewModel.updatePeople(it) } var tabSelected by remember { mutableStateOf(CraneScreen.Fly) }(2/2) Stage this hunk [y,n,q,a,d,K,g,/,e,?]? ydiff --git a/AdvancedStateAndSideEffectsCodelab/app/src/main/java/androidx/compose/samples/crane/home/CraneHome.kt b/AdvancedStateAndSideEffectsCodelab/app/src/main/java/androidx/compose/samples/crane/home/CraneHome.ktindex 5074428..4edde48 100644--- a/AdvancedStateAndSideEffectsCodelab/app/src/main/java/androidx/compose/samples/crane/home/CraneHome.kt+++ b/AdvancedStateAndSideEffectsCodelab/app/src/main/java/androidx/compose/samples/crane/home/CraneHome.kt@@ -36,6 +36,7 @@ import androidx.compose.samples.crane.base.ExploreSection import androidx.compose.samples.crane.data.ExploreModel import androidx.compose.ui.Modifier import androidx.compose.ui.graphics.Color+import androidx.lifecycle.compose.collectAsStateWithLifecycle import androidx.lifecycle.viewmodel.compose.viewModel
typealias OnExploreItemClicked = (ExploreModel) -> Unit(1/2) Stage this hunk [y,n,q,a,d,j,J,g,/,e,?]? y@@ -76,8 +77,8 @@ fun CraneHomeContent( modifier: Modifier = Modifier, viewModel: MainViewModel = viewModel(), ) {- // TODO Codelab: collectAsStateWithLifecycle step - consume stream of data from the ViewModel- val suggestedDestinations: List<ExploreModel> = remember { emptyList() }+ val suggestedDestinations by viewModel.suggestedDestinations.collectAsStateWithLifecycle()+
val onPeopleChanged: (Int) -> Unit = { viewModel.updatePeople(it) } var tabSelected by remember { mutableStateOf(CraneScreen.Fly) }(2/2) Stage this hunk [y,n,q,a,d,K,g,/,e,?]? y$ git statusOn branch state-codelabYour branch is up to date with 'origin/state-codelab'.
Changes to be committed: (use "git restore --staged <file>..." to unstage) modified: AdvancedStateAndSideEffectsCodelab/app/build.gradle modified: AdvancedStateAndSideEffectsCodelab/app/src/main/java/androidx/compose/samples/crane/home/CraneHome.kt
Changes not staged for commit: (use "git add <file>..." to update what will be committed) (use "git restore <file>..." to discard changes in working directory) modified: AdvancedStateAndSideEffectsCodelab/app/build.gradle$ git statusOn branch state-codelabYour branch is up to date with 'origin/state-codelab'.
Changes to be committed: (use "git restore --staged <file>..." to unstage) modified: AdvancedStateAndSideEffectsCodelab/app/build.gradle modified: AdvancedStateAndSideEffectsCodelab/app/src/main/java/androidx/compose/samples/crane/home/CraneHome.kt
Changes not staged for commit: (use "git add <file>..." to update what will be committed) (use "git restore <file>..." to discard changes in working directory) modified: AdvancedStateAndSideEffectsCodelab/app/build.gradlegit reset --soft <target commit> essentially undoes all commit metadata (the SHA, the message, etc.) from HEAD (current commit) to the target specified, while preserving the actual code changes in the staging area.
This is useful for editing commits! There are a variety of circumstances this comes up, I have an example below to demonstrate one possible use.
Suppose you’ve done a bunch of work, but haven’t finished the feature yet — maybe it’s the end of a lab and you want to pick up where you left off on your home computer. Here’s a possible workflow:
$ git add . (1)$ git commit -m "awlkdjal" (2)$ git push --set-upstream origin temp-branch (3)... # some time passes, you're on a new machine$ git fetch && git switch temp-branch (4)$ git reset --soft HEAD^ (5)... # make some edits$ git add . && git commit (6)$ git add . (1)$ git commit -m "awlkdjal" (2)$ git push --set-upstream origin temp-branch (3)... # some time passes, you're on a new machine$ git fetch && git switch temp-branch (4)$ git reset --soft HEAD^ (5)... # make some edits$ git add . && git commit (6)- Add all changes to staging area
- Making some temporary commit with a throw-away message (this is fine, since we will delete this information later)
- Push the commit to some temporary remote branch (so you can get it later on another machine)
fetchto retrieve latest updates from remote,switchto switch branches- Leaves working tree as it was before “reset” i.e. none of the committed changes are discarded, they are now marked as “staged” just as they were before (2)
- Stage changes and make a proper commit message once you are finished.
In truth, I don’t use this option very often, but I am including it to demonstrate the difference between it and the --soft option which I use all the time.
$ git commit ...$ git reset --hard HEAD~3 (1)$ git commit ...$ git reset --hard HEAD~3 (1)- Let’s say your last three commits (HEAD, HEAD^, and HEAD~2) were bad and you do not want to ever see them again. Do not do this if you have already given these commits to somebody else (i.e. pushed the commits to a branch that other developers will use)
Suppose that you have created lots of logically separate changes
and committed them together. Then, later you decide that it might
be better to have each logical chunk associated with its own
commit. You can use git reset --soft to rewind history without changing
the contents of your local files, and then successively use git add -p to interactively select which hunks to include into each commit,
using git commit -c to pre-populate the commit message.Split one commit into many with reset and add -p
$ git reset -N HEAD^ (1)$ git add -p (2)$ git diff --cached (3)$ git commit -c HEAD@{1} (4)... (5)$ git add ... (6)$ git diff --cached (7)$ git commit ... (8)$ git reset -N HEAD^ (1)$ git add -p (2)$ git diff --cached (3)$ git commit -c HEAD@{1} (4)... (5)$ git add ... (6)$ git diff --cached (7)$ git commit ... (8)- First, reset the history back one commit so that we remove the original commit, but leave the working tree with all the changes. The -N ensures that any new files added with HEAD are still marked so that git add -p will find them.
- Next, we interactively select diff hunks to add using the git add -p facility. This will ask you about each diff hunk in sequence and you can use simple commands such as “yes, include this”, “No don’t include this” or even the very powerful “edit” facility.
- Once satisfied with the hunks you want to include, you should verify what has been prepared for the first commit by using git diff —cached. This shows all the changes that have been moved into the index and are about to be committed.
- Next, commit the changes stored in the index. The -c option specifies to pre-populate the commit message from the original message that you started with in the first commit. This is helpful to avoid retyping it. The HEAD@1 is a special notation for the commit that HEAD used to be at prior to the original reset commit (1 change ago). See git-reflog(1) for more details. You may also use any other valid commit reference.
- You can repeat steps 2-4 multiple times to break the original code into any number of commits.
- Now you’ve split out many of the changes into their own commits, and might no longer use the patch mode of git add, in order to select all remaining uncommitted changes.
- Once again, check to verify that you’ve included what you want to. You may also wish to verify that git diff doesn’t show any remaining changes to be committed later.
- And finally create the final commit.
The following notes were adapted from the MAN page of git-rebase.
Rebasing interactively means that you have a chance to edit the commits which are rebased. You can reorder the commits, you can change them, and you can remove them.
The interactive mode is meant for this type of workflow:
- make a series of changes on a codebase, something like:
- create a series of completed commits
- make partial progress on some other work saved in a temporary commit
- fixup of some previous mistakes in the codebase
- commit those changes and
git pushthem to a shared repository - your changes were not approved, repeat step 1 until they pass approval.
Sometimes the thing fixed in 1.c cannot be amended to the not-quite perfect commit it fixes, because that commit is buried deeply in your commit history. That is exactly what interactive rebase is for: use it after plenty of “1.a”s and “1.b”s, by rearranging and editing commits, and squashing multiple commits into one.
That is, after any normal day of development, git rebase --interactive lets you organize your work into a series of commits at will.
Start git rebase -i with the last commit you want to retain as-is:
git rebase -i SHA-or-reference-to-commit
## E.g. using reference to HEADgit rebase -i HEAD~2
## E.g. SHA commit id (first 7 digits is enough)git rebase -i fa1afe1git rebase -i SHA-or-reference-to-commit
## E.g. using reference to HEADgit rebase -i HEAD~2
## E.g. SHA commit id (first 7 digits is enough)git rebase -i fa1afe1An editor will be fired up with all the commits in your current branch that come after the given commit. You can reorder the commits in this list to your heart’s content, and you can remove them.
Assume the commit BEFORE the one you selected has the id 9f36727. The resulting git rebase TODO list will look more or less like this:
pick deadbee The oneline of this commitpick fa1afe1 The oneline of the next commit
# Rebase 9f36727..fa1afe1 onto 9f36727 (2 commands)## Commands:# p, pick <commit> = use commit# r, reword <commit> = use commit# e, edit <commit> = use commit# s, squash <commit> = use commit# ... more commands followpick deadbee The oneline of this commitpick fa1afe1 The oneline of the next commit
# Rebase 9f36727..fa1afe1 onto 9f36727 (2 commands)## Commands:# p, pick <commit> = use commit# r, reword <commit> = use commit# e, edit <commit> = use commit# s, squash <commit> = use commit# ... more commands followThe oneline descriptions are purely for your pleasure; git rebase will not look at them. The commit SHA-ids (deadbee and fa1afe1 in this example) are the important part: do not delete or edit the ids.
The TODO list that git rebase --interactive is showing you is the default commands that take place when you run a normal git rebase. By default, each commit in the range specified is picked i.e. applied to your current branch, starting from the top and working towards the bottom.
What git rebase --interactive allows you to do is to change the pick instruction for each commit to some other instruction. This is where the real power of the command lies.
By replacing the command pick with the command edit, you can tell git rebase to stop after applying that commit, so that you can edit the files and/or the commit message, amend the commit, and continue rebasing.
To interrupt the rebase (just like an edit command would do, but without cherry-picking any commit first), use the break command.
If you just want to edit the commit message for a commit, replace the
command pick with the command reword.
To drop a commit, replace the command pick with drop, or just
delete the matching line.
If you want to fold two or more commits into one, replace the command
pick for the second and subsequent commits with squash or fixup.
git rebase will stop to give you the change to make changes when pick has been replaced with edit or when a command fails due to merge errors. When you are done editing and/or resolving conflicts you can continue with git rebase --continue.
Reordering and editing commits usually creates untested intermediate steps. You may want to check that your history editing did not break anything by running a test, or at least recompiling at intermediate points in history by using the exec command (shortcut “x”). You may do so by creating a todo list like this one:
pick deadbee Implement feature XXXfixup f1a5c00 Fix to feature XXXexec ./gradlew build # exec can run any shell command -- might as well rebuild the project!pick c0ffeee The oneline of the next commitedit deadbab The oneline of the commit afterexec ./gradlew build...pick deadbee Implement feature XXXfixup f1a5c00 Fix to feature XXXexec ./gradlew build # exec can run any shell command -- might as well rebuild the project!pick c0ffeee The oneline of the next commitedit deadbab The oneline of the commit afterexec ./gradlew build...The interactive rebase will stop when a command fails (i.e. exits with
non-0 status) to give you an opportunity to fix the problem. You can
continue with git rebase --continue.
The exec command launches the command in a shell (the one specified
in $SHELL or the default shell if $SHELL is not set), so you can use
shell features (like cd, >, ; …). The command is run from the
root of the working tree.
In interactive mode, you can mark commits with the action edit.
However, this does not necessarily mean that git rebase expects the
result of this edit to be exactly one commit. Indeed, you can undo the
commit, or you can add other commits. This can be used to split a
commit into two:
- Start an interactive rebase with
git rebase -i <commit>, where<commit>is the commit you want to split. In fact, any commit range will do, as long as it contains that commit. - Mark the commit you want to split with the action
edit. - When it comes to editing that commit, execute git reset HEAD^. The effect is that the HEAD is rewound by one, and the index follows suit. However, the working tree stays the same.
- Now add the changes to the index that you want to have in the first commit. You can use git add (possibly interactively) or git gui (or both) to do that.
- Commit the now-current index with whatever commit message is appropriate now.
- Repeat the last two steps until your working tree is clean.
- Continue the rebase with
git rebase --continue.
If you are not absolutely sure that the intermediate revisions are consistent (they compile, pass the testsuite, etc.) you should use git stash to stash away the not-yet-committed changes after each commit, test, and amend the commit if fixes are necessary.